I had a great game against Trick at MOAB Last weekend. We played on day 2 at 80 points. The tournament - Baptism of Fire was v4 MW and was split into 3 different 1 day events. Days 1 and 2 were 80 points and day 3 was 100 points. Trick (TO for MOAB and Aussie ETC Captain) asked Battlefront to make available the soon to be released Italian M14/41 cards. The tournament also allowed build cards. Both of these measures were designed to provide as much variety as possible.
So it was to be all German affair as my DAK Tanks Company took on Trick's DAK Tanks.
Trick's list was:
HQ - 1 Panzer III
3 Panzer III short 5cm
2 Panzer IV short
3 Panzer II
HQ 1 x Sd kfz 221 MG
2 x 222 and 2 x 221 2.8cm
2 x 222 and 2 x 221 2.8cm
2 x 222 and 2 x 221 2.8cm
2 x 222 and 1 x 221 2.8cm
2 x 8-rad
Support
1 x 88
3 x M14/41
4 x Marders
My List was:
 |
| My force. 1 Panzer 2 is camera shy. |
HQ - 1 Panzer III
3 Panzer III short 5cm
3 Panzer III short 5cm
4 Panzer II
Support
4 x Marders
4 x Schleppers
4 x M14/41
Trick chose Maneuver and I choose Attack. We rolled up Counter Attack and because I chose the attack stance, I attacked. Trick chose a terrain dense quarter and I choose to make him move across the length of the table. Trick put him objective as close as possible to the quarter he would have to move to. I placed mine right in the back corner as far as possible.
I will refer to all directions from my left or right. Apologies, I didn't take a photo of deployment.
Deployment:
Trick placed all his Panzers except his Pz2s in reserve. The M14s and unit of 222/221 were left back on my left to keep me honest. Trick started with a spearhead of his armoured cars towards the right objective. This allowed him to reach out to just over 16" from the far objective. He deployed 2 units of armoured cars, 8-rads and the 88 just to the right of the central village. The panzer 2s and the 221 HQ were left loitering behind the buildings. The Marders were in ambush.
I also spearheaded with my PzIIs to just short of the railway line. This allowed me to setup my Marders hull down on the hill to the right of my deployment area. All the other units were able to deploy on or near the hill. Virtually all had a shot on the enemy.
Turn 1.
The PzIIs moved up with 2 having a bead on Trick's PzIIs. A unit of Panzer 3 moved to the right from behind the hill to get a shot. Ever one else stayed still. I started with dropping a 15 cm Schlepper barrage on most of the armoured cars and an 88 in the open. I didn't do much damage, bailing an armoured car from 2 different units. All the other units opened up. When the dust cleared, a unit of 4 armoured cars were reduced to 1, the 8 rads were down to one bailed vehicle and the PzIIs were down to 2. A pretty good start.
Trick remounted and passed the last stand on both the 8-rad and the remaining 222. These 2 would be a pain in the neck for the rest of the game. The Marders sprung from ambush in about the only available spot to my left. No reserves arrived.
The 8-rad and remaining 222 were moved to safety behind the wood in front of the right objective. The Italians and armoured cars from the deep left started the long trek to the right. A second PzII peeked out for a shot.
The Marders picked at my left hand unit of PzIIIs, taking one down and bailing 2. Lucky for me. The 88 missed as did the armoured cars and PzIIs. Not a great round for Trick.
Turn 2.
I remounted the 2 PzIIIs. I moved up the M14s, the RH PzIIIs and PzIIs. I picked off another armoured car from the unit of 3. The LH PzIIIs and 1IC moved to the left to engage the Marders. I hit twice but only managed bails.
Trick rolled up a reserve and the PzIIIs arrived on the back RH corner behind my Marders. Crap! Thankfully for me, they got the memo about it being a training missing and missed! The 88 sniped a RH PzIII. The Marders bailed another PzIII after remounting.
Turn 3.
After a good start, things are changing quickly, the Marders are in a position to pick off vehicles from my back field, the 88 has a good arc of fire and my Schleppers cannot hit them. The reserves are starting to arrive and I am still some way from the objective. Trick is doing a great job of giving me lots of threats to deal with.
My Marders blitz and turn to face the PzIIIs, newly arrived from reserve. I roll pretty well and get 4 hits. I destroy 2 and bail the third. Time to move up. I move forward with my RH PzIIIs destroying another armoured car. My Italian tanks move up to engage the 88 but do no damage. The Schleppers range in on the Marders but do not damage either.
The pesky 8-rad and 222 are still alive having made more 5+ last stand tests. They make a reappearance moving to engage my RH PzIIIs in the flank. The PzIVs arrive from reserve to join in against my RH PzIIIs and take one out from the flank. Trick's Marders disengage from the fire fight on my left to reinforce his center against my advance. The M14s, having arrived in the fight on my left bag a Schlepper. The remaining PzIIIs from reserve remounts and survives the last stand test to blitz and bag a Marder. The 88s and a armoured car destroy 2 of my M14s. The 221 HQ and a the 2 remaining armoured cars from the short platoon are now on the RH objective behind the hill.
Turn 4.
My LH PzIIIs remount to prevent a last man test. My Marders finish off the last PzIII on my right. My RH PzIII destroy a reserve PzIV. Despite loses, my PzIIs and M14s advance. They need to push on the objective if I am to stay in the game. My LH PzIIIs take out another M14. This is going to be close one.
You guessed it, the 222 and the 8-rad are still there and still running at my flanks. Thankfully they are not doing much damage either. The PzIV kills another of my PzIIIs and the platoon is finished off. The HQ PzIII arrives from reserves but is also on a training mission and does no damage. The 88 speaks again and kills another M14. My PzIIs are now exposed on their dash to the objective and one more dies. Trick's Marders are now at the back in position next to the 88 and shoot but cannot damage a PzIII.
Turn 5.
My M14s fail their last stand. The Marders move out to the RH table edge to snipe at the 221 HQ stacking out at the back of the hill and manage to brew him up. The PzIIs, now in 4 inches of the RH objective hit but only bail one of the 2 armoured cars on the objective. If he doesn't remount, he will be taking a last stand. I manage to destroy the 8-rad and the 222 that have been holding firm all game. I throw everything at the remaining PzIV and nab it. The Panzer formation will auto-break next turn.
And....
The 222 doesn't remount..
And...
...
...
Fails it's last stand. That leaves just one platoon in the Armoured Car formation so they break too. No formations alive and the game is over 7-2. What a close one.
A really close and enjoyable game that could have gone either way. I am really enjoying MW v4 and hope to play much more of it. I hope you enjoyed this AAR.
3 Panzer III short 5cm
3 Panzer III short 5cm
4 Panzer II
Support
4 x Marders
4 x Schleppers
4 x M14/41
Trick chose Maneuver and I choose Attack. We rolled up Counter Attack and because I chose the attack stance, I attacked. Trick chose a terrain dense quarter and I choose to make him move across the length of the table. Trick put him objective as close as possible to the quarter he would have to move to. I placed mine right in the back corner as far as possible.
I will refer to all directions from my left or right. Apologies, I didn't take a photo of deployment.
Deployment:
Trick placed all his Panzers except his Pz2s in reserve. The M14s and unit of 222/221 were left back on my left to keep me honest. Trick started with a spearhead of his armoured cars towards the right objective. This allowed him to reach out to just over 16" from the far objective. He deployed 2 units of armoured cars, 8-rads and the 88 just to the right of the central village. The panzer 2s and the 221 HQ were left loitering behind the buildings. The Marders were in ambush.
I also spearheaded with my PzIIs to just short of the railway line. This allowed me to setup my Marders hull down on the hill to the right of my deployment area. All the other units were able to deploy on or near the hill. Virtually all had a shot on the enemy.
Turn 1.
The PzIIs moved up with 2 having a bead on Trick's PzIIs. A unit of Panzer 3 moved to the right from behind the hill to get a shot. Ever one else stayed still. I started with dropping a 15 cm Schlepper barrage on most of the armoured cars and an 88 in the open. I didn't do much damage, bailing an armoured car from 2 different units. All the other units opened up. When the dust cleared, a unit of 4 armoured cars were reduced to 1, the 8 rads were down to one bailed vehicle and the PzIIs were down to 2. A pretty good start.
Trick remounted and passed the last stand on both the 8-rad and the remaining 222. These 2 would be a pain in the neck for the rest of the game. The Marders sprung from ambush in about the only available spot to my left. No reserves arrived.
The 8-rad and remaining 222 were moved to safety behind the wood in front of the right objective. The Italians and armoured cars from the deep left started the long trek to the right. A second PzII peeked out for a shot.
 |
| Ambushing Marders and redeploying M14s and ACs |
Turn 2.
I remounted the 2 PzIIIs. I moved up the M14s, the RH PzIIIs and PzIIs. I picked off another armoured car from the unit of 3. The LH PzIIIs and 1IC moved to the left to engage the Marders. I hit twice but only managed bails.
 |
| RH units advancing after the initial shooting |
Turn 3.
After a good start, things are changing quickly, the Marders are in a position to pick off vehicles from my back field, the 88 has a good arc of fire and my Schleppers cannot hit them. The reserves are starting to arrive and I am still some way from the objective. Trick is doing a great job of giving me lots of threats to deal with.
My Marders blitz and turn to face the PzIIIs, newly arrived from reserve. I roll pretty well and get 4 hits. I destroy 2 and bail the third. Time to move up. I move forward with my RH PzIIIs destroying another armoured car. My Italian tanks move up to engage the 88 but do no damage. The Schleppers range in on the Marders but do not damage either.
 |
| Panzer IVs arrive from reserve |
 |
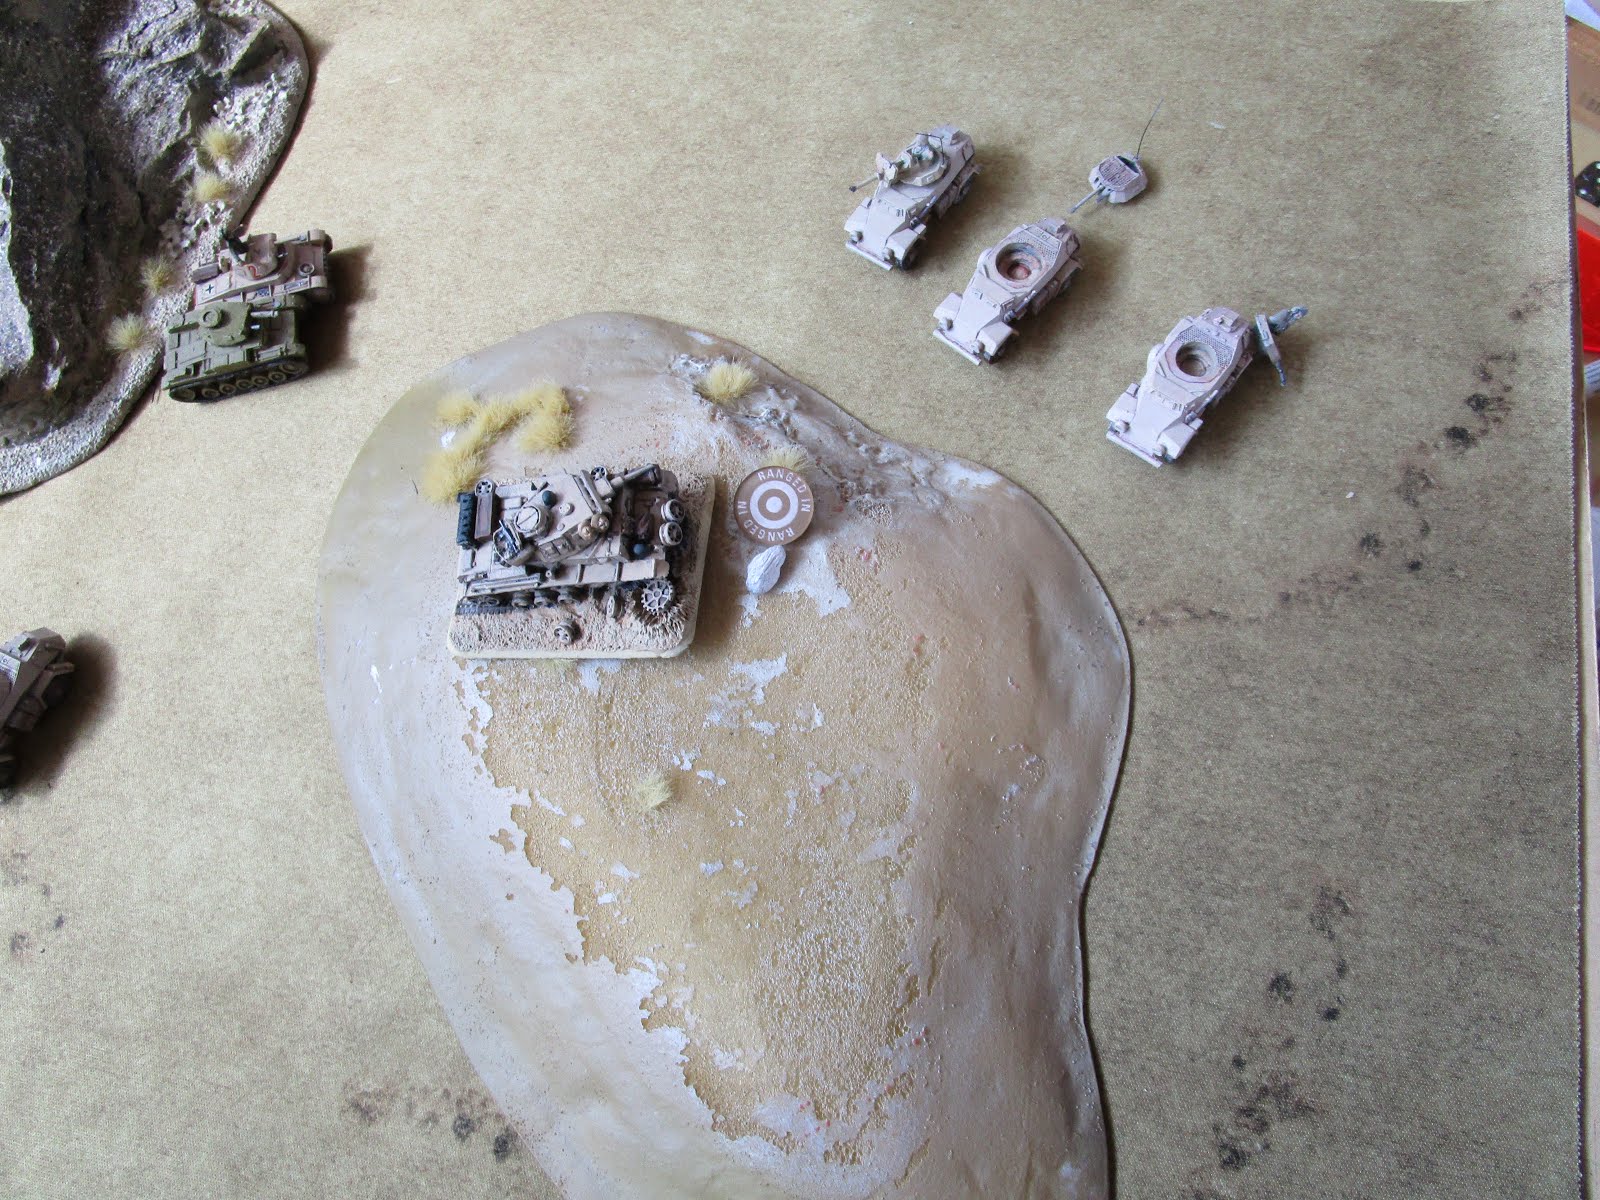
| Note the pesky armoured car on the right |
My LH PzIIIs remount to prevent a last man test. My Marders finish off the last PzIII on my right. My RH PzIII destroy a reserve PzIV. Despite loses, my PzIIs and M14s advance. They need to push on the objective if I am to stay in the game. My LH PzIIIs take out another M14. This is going to be close one.
You guessed it, the 222 and the 8-rad are still there and still running at my flanks. Thankfully they are not doing much damage either. The PzIV kills another of my PzIIIs and the platoon is finished off. The HQ PzIII arrives from reserves but is also on a training mission and does no damage. The 88 speaks again and kills another M14. My PzIIs are now exposed on their dash to the objective and one more dies. Trick's Marders are now at the back in position next to the 88 and shoot but cannot damage a PzIII.
 |
| Battlefield littered with armoured cars, my M14s and PzIIIs. |
My M14s fail their last stand. The Marders move out to the RH table edge to snipe at the 221 HQ stacking out at the back of the hill and manage to brew him up. The PzIIs, now in 4 inches of the RH objective hit but only bail one of the 2 armoured cars on the objective. If he doesn't remount, he will be taking a last stand. I manage to destroy the 8-rad and the 222 that have been holding firm all game. I throw everything at the remaining PzIV and nab it. The Panzer formation will auto-break next turn.
And....
The 222 doesn't remount..
And...
...
...
Fails it's last stand. That leaves just one platoon in the Armoured Car formation so they break too. No formations alive and the game is over 7-2. What a close one.
 |
| And the end. PzIIs and Marders (outside of pic) deal with the last of the ACs |
No comments:
Post a Comment