Sunday, 30 October 2016

Painting: Battlefront Romanian Staff Team and Command (RSO101)

I recently painted some Skoda 100mm guns. You will find the blog post here. It is now time to paint up the command and staff team.

Review:
Battle front make a pack that contains crew for 4 guns plus command, staff team and spotter. Basically enough figures for a full battery except for the guns. This is for minor nations who used the same equipment as the major powers. You simply buy the Artillery pack and the separate guns you need.

For anyone that has put together staff teams, spotters and commanders, there is nothing new here. For new players, the staff team provided is a small vignette of staff and radio operator around a table planning fire.

Once you have seen one, you have seen them all. Every pack I have seen follows the same simple but effective formula. Occasionally you see a scenic base but that is the only real variety.

Painting:
I followed my normal painting plan for Romanians. Despite the fact that it is basically guys in brown again, the table and officer figures were a welcome change.

You may well ask where the spotter is. Oops, still undercoated white. He will be painted in a future batch.

Pictures:
On to the pictures.
I hope you enjoyed this post. The Romanian project is quickly coming to an end. There is only a few more things in the painting queue for the army. Time to plan the next project.


Staff Team
Stands from the front
Teams from the rear.

Command Team.

Saturday, 29 October 2016

Review: Battlefront TAC 47mm Schneider (RO510)

Schneider 47mm gun on display at National Military Museum in Bucharest. Photo from https://ro.wikipedia.org/wiki/Tun_antitanc_Schneider_calibru_47_mm_model_1936

History:
The Schneider 47mm gun was a French designed gun. Originally a batch of 160 were sold to Romania. The Romanians then built more under license in the Concordia factory in Ploesti. The guns were manufactured and used right through the war.

The anti-tank gun was light weight (628kgs) and therefore highly mobile. The gun shield was small but the wheels could be shifted to increase the effective size and coverage of the shield. The gun was fitted with a muzzle break and could fire a 2.3kg round.

Review:
The Battlefront blister (RO510) like normal contains everything you need for a platoon. In this case, 3 47mm Schneider guns and a command stand. The guns themselves are made up of the trail, the gun and the gun shield. Each gun comes with 4 crew. I am actually painting up 2 blisters worth and accidentally left 6 guns instead of 3 in the picture. Here is the blister contents:

RO510 contents. Ignore half the gun barrels.
The gun components had lots of flash and mould lines to clean up, even more than normal. However all components were well cast and free of damage. Being only 3 simple pieces they went together well. The crew were likewise free of damage and minimal cleanup saw these ready to go.

A blury photo of the assembled gun
I have chosen to only use 3 crew per gun. I have also decided not to glue the guns down on the base. This will allow me to use the same crew and bases for pak38s as a LW option. I will just swap them out as required.

As I mentioned above, the gun shield on the Schneider 47mm gun was small. It was augmented by shifting the wheels to increase the size of the shield. This is nice modelling aspect that Battlefront have chosen to model. It would have been awesome to also have them with the wheels attached for more variety. Still the models look great as it is.

Photos:
Here are the photos. I will post up some more photos when these are painted. I hope you enjoyed the review.

The first gun and crew assembled.

And then there were three.

The full platoon with command stand.

Thursday, 27 October 2016

Review and unboxing: Battlefront Mosque (BB178)

The MW desert reboot is coming!!

If you read my recent why we fight podcast review, you will know that version 4 is coming. Also coming is the relaunch of the mid war period starting in the desert. Both of these things have got me very excited.

My first army was a US MW army and the desert and MW are still my favorite period. When I started playing flames or war, it was simpler to simply collect a European table of terrain. Now, with v4 and the desert reboot, now is the time to start putting together my desert table. I have collected a few items and I will be picking up some more in coming months. I really hope that Battlefront release some new pieces with their desert releases. Fingers crossed!

Review and Un-boxing:
One of the pieces I want my table to feature is the Mosque that Battlefront recently released for the Arab Israeli period. It will work well for a WW2 desert table too. It is a fairly big piece so, a good piece to start with.

Here are my pictures and comments as I unbox the Mosque.

The box.

Inside is a foam-wrapped package.

Individually wrapped pieces

Mosque components.

The pack also contains a Minaret

Building pieces and Minaret

And the complete Mosque and Minaret ready for the table.
The Mosque is large enough to house 4 medium bases. There is also some room on top around the dome for some small bases.

This is my first piece of Battlefield in a base desert terrain and it is a beauty. The model is made from solid resin. Mine was very well packed as you can see above and arrived to me with zero damage. Like all Battlefield in a box pieces, it is fully painted, fully assembled and table ready. Including taking photos, I had mine out of the box and table ready in 5 minutes.

The dome on the building and the Minaret are a bold gold/brass colour and really stand out from the white walls. It will also stand out on a desert board too. The roof is cast with a small crate that serves as a hold so it can be easily removed and figures placed in side. Inside, there is a nicely detailed patterned floor that really adds another level to the building.

The only minor quibble I have is the crescent for the dome. It is quite a long piece and I expect it will break first. However the dome looks perfectly good without it so no big deal. Overall, I give this box 9 out of 10.

The model is currently on sale on the Flames Of War site for $37.50 USD. Here is the link. Overall, I think this is excellent value, especially as it is on sale. I think mine was $60 AU and I consider this a pretty good deal.

Wednesday, 26 October 2016

Review: Battlefront Romanian Infantry Platoon (RO702)

History:
The Romanian Infantry like much of the Romanian army were issued with Czech equipment. The rifle used was the ZB 1924. It fired a standard 7.92mm round. Each section was also equipped with a ZB 1930 Machine Gun.

Review:
This blister is the usual offering from Battlefront. It containers everything you need for a Romanian Infantry platoon for a Batalian Puscasi. That is 4 squads each of 2 stands of 5 figures and a command stand. Included are 8 medium and 1 small base. The pack contains an officer, a tank hunter, 5 NCOs, 4 MGs, 32 rifles. The blister was complete when I opened it up.

The BF blister.
As I pulled out the figures and started to sort them into poses as I always do, I found there was a guy with a missing arm. I put him aside thinking he was a miss-cast. I then continued to go through the pile until I found 3 more. Were they all miss cast? I then noticed 4 arms, each holding a rifle. They are multi-part figures! I have been playing FOW and painting BF figures for years and I have only come across this once before - and never with infantry models. The good news is that with 30 seconds work, they are easy to glue into a reasonably useful pose. I just cannot work out why. Perhaps the figure couldn't be cast as one piece?

The two piece cast. Extreme close ups equal no place to hide from painting mistakes!

Aside from the one-armed men, the pack was full of nicely cast models with very little flash. What I really liked is that each base is designed for 5 models, I chose to use just 4, so I have 8 figures left. I pulled out a spare base so I can have an EW compliant 10 stand platoon.

Painting:
Earlier this month, I painted up a small batch of these same troops. The post is here. I used the same painting scheme.

Here are the photos. I hope you enjoy my first full infantry platoon. Please feel free to leave comments. Especially if you can shed some light on the one armed bandits!

The full platoon


Close up of an NCO leading his squad.
Platoon defending a wall.
Forward men!
Close up of stand. Notice the bandit on the right of the base!
Platoon Commander.


Tuesday, 25 October 2016

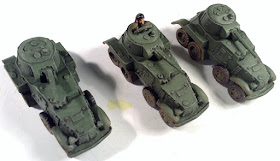
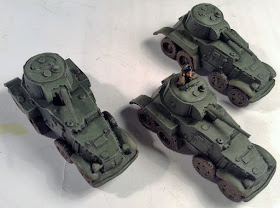
Painting: Battlefront BA10 (SU301)

I reviewed these beauties earlier. Check out the review here

It has taken me a little while to finish the painting but they are done. These models painted up really well. I love the shape of these old vehicles. They look as much like a large saloon car and they do an armoured car.

Battlefront have done a great job recreating this model. It looks just like the picture I have put up on the original review. All the joins, handles, and panels on the turret and body are raised and respond well to washes and highlights.

Here are the steps I took to paint these up:

1. After cleaning up the models, I sprayed them in army painter white. I gave them 2 light coats.
2. I then base coated them with Vallejo Olive Grey (888) using a brush.
3. I then hit them with a wash of Army Painter strong tone - again with a brush.
4. I then went over the panels with the Olive Grey again making sure to leave the recesses, corners and low points.
5. I then hit the hull with a very, very light highlight of Vallejo Green Grey (886). This picked up the edges, rivets and hatch handles.
6. I weathered the wheels with Vallejo Flat Earth (70983)
7. Finally I painted the the commander. My research shows that the tank crews wore a black cap and the same colour overalls/uniform as the army.

These are basically the same steps I took with the rest of the Romanian armour. These will also need some decals when I get some.


Anyway, on to the pics. I hope you enjoyed this post.


Sunday, 23 October 2016

Painting Tips 2.

My first painting tips post can be found here

After some positive feedback for my Painting Tips 1 post, I have decided to do a second. This one will focus on the spray can.

What can be so hard about using a spray can? The answer is nothing if you are spraying something simple. However it gets complex when you are spraying a 15mm high figure or a 1:100 tank.

Here are some of the tips I have learnt or picked up over the years. Many of these have been learnt the hard way. I.E from my own disasters. I will share some of them too.

So here are my top spray can tips from an average painter:

1. Always shake your can well before and during use. Shaking the can for a few minutes will make sure the paint and propellant are mixed and you will get a smooth spray.
2. Don't spray in humid weather or when it is too hot or cold. This is critical for spray varnish. The moisture in the air affects the paint and you get a poor finish. For varnish, this is a white ghosting or frosting that looks really bad. This has happened to me before. I have had several units finished and rather than waiting for a better day, sprayed them on a really humid day. Result frosted army!
3. Make sure you test if you are unsure. If you are worried it is too humid, too hot or too cold, try spraying a old, painted figure. Then try one of your stands/tanks. If all is well, go ahead with the rest.
4. Keep the spray can 30cm from your figures. Any closer and you will end up with a liquid finish. What you want is a smooth, thin, consistent finish. I have sprayed too closely and ended up with tons of detail obscured. The depth of detail isn't huge on a 15mm figure, you don''t want to obscure it with a spray coat that is too think.
5. Spray in a line from outside the first figure, till past the last one. Don't start pointing at a figure, this will result in that figure being hit by too much paint. Likewise, don't stop on the last figure for the same reason.
6. Spray in thin coats with a consistent motion. You can always spray a second or third light coat for better coverage. You cannot remove half a thick coat.
7. Never spray inside. The stuff is toxic and you don't want it in your home. It is also paint and can leave a mark. Unless you are Jackson Pollock, it probably wont be a great art work.
8. Always wear a mask or respirator. Paint particles should not be inhaled.
9. This is the most valuable tip I have picked up. Heat your can before use. Whether you run under warm water or leave on a window sill in indirect light for a few minutes, this really makes a difference. Paint flows so much more smoothly and consistently. You wont see gluggy blobs if you warm your can first. Don't leave the can in hot places or for too long. You want it to slightly warm up, not explode.
10. Lastly, when you finish, turn the can upside down and spray. This will push propellant but not paint through the nozzle. This will clean out the nozzle and stop it from blocking up.

These are tips that have worked for me. They are general in nature. Every can is different. Be sure you check the instructions on the can and follow them.

I hope this has been useful. Please feel free to leave comments. If there is anything you want me to cover in a later painting post, please let me know.

Saturday, 22 October 2016

Painting: Battlefront R-2 Romanian Tank (RO010)

Avid readers will recall, I reviewed the Battlefront R-2 tank here. It is a lovely model.

I have finally got them painted. These are great models and despite being a few years old, came up very well. I just love the riveted joins, the hatches and the distinctive machine guns. These are in the classic Battlefront exaggerated style with large and distinctive tools, machine guns and other equipment. From a painting point of view, this depth of detail really allows the painter to feature these items as they are just a little more prominent on the model that some other brands.

These were a breeze to paint. Here are the steps I took:

1. After cleaning up the models, I sprayed them in army painter white. I gave them 2 light coats.
2. I then base coated them with Vallejo Olive Grey (888) using a brush.
3. I then hit them with a wash of Army Painter strong tone - again with a brush.
4. I then went over the panels with the Olive  Grey again making sure to leave the recesses, corners and low points.
5. I then hit the hull with a very, very light highlight of Vallejo Green Grey (886). This picked up the edges, rivets and hatch handles.
6. I painted up the machine guns with black first then highlighted with Games Workshop Bolt Gun Metal. I have long ago poured a liberal amount of black into my Bolt Gun Metal so it not too shiny.
7. I weathered the tracks with Vallejo Flat Earth (70983)
8. Finally I painted the tools and the commander. My research shows that the tank crews wore a black cap and the same colour overalls/uniform as the army.

Sadly I have not got an Romanian decals to hand so here they are without decals. I will look to get some asap and take some better photos of the whole unit on a gaming table.

Here are the pictures. I hope you have enjoyed this painting post.


Friday, 21 October 2016

Review - Battlefront Romanian 100mm Howitzers (RO580)

History:
The Skoda 100mm Howitzer or Skoda Model 1914/1931 was a Czech manufactured gun used my many of the forces in WW2 including the Italians, Romanians Poles and Germans. This gun was initially created in WW1 and was used right through the period between the wars all the way to the end of WW2 - 1945.

At the outbreak of war, The Romanian army assigned 2 artillery regiments to each of the infantry divisions. Each of these artillery regiments had either 8 or 16, 75mm guns and 8, 100mm howitzers. Whilst the organisation of the artillery and the army as a whole changed during the war, the use of the Skoda 100mm howitzer remained.

Review:
Needing some artillery support for my new EW Romanian force, I went for some of the iconic Skoda guns. This is from the Battlefront blister RO580 and comes with 4 guns and 20 crew. The pack had the full complement of 20 crew but I have elected to use just 16 - 4 for each gun. The guns are nicely cast with a minimum of flash. Otherwise the guns look great. The large curved gun shield is one piece and assembly time for these guns is very short. I was lucky enough to have a friend assemble and start painting these particular guns but I have assembled the model before for my Italians.

The gun crew were easy to clean up and paint. Like most gunners, these have very little in the way of equipment so paint up really quickly. I followed the same scheme that you can see on my review of the Romanian Infantry here.

This is my favorite looking artillery piece of the war and Battlefront have done a great job on bringing it to the table. The curved gun shield and distinctive barrel looks the business. I will certainly consider other armies that I can use these Skoda guns with. Perhaps some German mountaineers.

In the Game:
Generally in EW, artillery is pretty expensive. This is because the majority of tanks have low armour ratings that can be easily penetrated by the direct fire capabilities of artillery. Combine this with strong bombardment statistics and you have a powerful unit if used correctly.

The 100mm artillery available to the Romanians isn't too expensive compared to the 150mm artillery. I think these are a good compromise at 230 points. I will take a single battery of these in most of my armies.

On the field as I said above, they have a strong bombardment with AT4 and good firepower at 4+. On direct fire, they are AT 7 with a firepower of 2+ and are rated as breakthrough guns. This will make them good on the defense by having the option of direct fire or bombardment. On the attack, they can lay down some bombardments and hopefully dig some entrenched foes out. Sadly they are not equipped with smoke rounds but that is what mortars are for!

Pictures:
Without Further ado, here are some pictures. I hope you enjoyed my review.

Fire!


The Battery arrayed.
From the rear.


Tuesday, 18 October 2016

Why We Fight 7 - Summary of information and review

After listening to the excellent “Why we fight, episode 7: Tanks, Tracks, Bang, Yeah with Peter Simunovich” podcast from the WWPD guys (http://www.wwpd.ne/2016/10/why-we-fight-ep-7-tanks-tracks-bang.html?m=1). I thought I would try and summarise and give some of my thoughts.

First off, there was a ton of information shared in a very short period of time. Hopefully I do it justice. I strongly recommend downloading the WWPD podcast and listening to it yourself. Both the Why we fight and News from the Front podcasts are terrific and have always been great at sharing new information often via interviews with key stakeholders at BF.

So, here are the points I picked up.

1.      Battlefront (BF) are looking to bring out a new Team Yankee (TY) style hardcover book for Vietnam and Fate of a Nation. I.E a new rule set based on the TY ruleset.
2.      Peter is personally keen on a Bush War/Angola list. We might see this in the future.
3.      BF are committed to finishing off Berlin. We should expect a compilation in March 2017.
4.      The big news – There will be a version 4 of the rules. This will be in two ways. Firstly there will be new rule book for EW and LW. This will allow all of the current EW and LW books to be used with the current points values, including the new Berlin compilation that is about to come out. 95% of these books will be compliant with the new V4 rules
5.      For MW, there will not only be a new rule book but it will be accompanied by new dessert lists. Initially these will be for Brits and DAK. Other dessert forces and then Eastern Front lists to follow. These will be a new 100 point style system. There will be cards.
I think this will be great. MW is my favourite period and is currently a bit stale. It seems the perfect place to start again for BF. I cannot wait to dive into this period again with new rules and lists.
6.      The new V4 rules will be inspired by TY. However Peter went out of his way to say they will not be the same. To paraphrase him, WW2 is a much richer historical period than the Cold War, with more forces and troops and vehicles. The rules will need to match.
7.      There will be a new V4 rulebook. How this will work exactly was not detailed. This is awesome news. I got a free V3 rulebook when that book came out and that really kept me excited about the new rules. Hopefully this will do the same for V4.
8.      The rules will be more streamlined and won’t cover every possible point like the current 300 odd page V3. Instead there will be a new Letters from the Front type document with a cooler name that will serve as a living document to accompany the rules. I see this aimed more at the tournament gamer than the Friday night garage gamer.
9.      The new rules will retain the current morale and motivation settings. Peter used the example that Fearless Veteran will remain. This to me is good news. This is one of the charming aspects of FOW and something that isn’t really in TY.
10.   Even though cards were announced, Peter did say that players don’t need to use them. The current TY doesn’t NEED the cards. This might be how older gamers with big collections can get by without the cards.
11.   BF are still working on how to distribute cards. Selling packs was raised as an option. However it sounds like nothing is yet set in stone. BF is looking for feedback on this.
12.   Forces will remain. Peter did say there is a big effort involved in updating forces but he sees it as critical to the game. I for one love forces and easy army before it and would struggle without this excellent tool. If you haven’t tried it, it can be found at forces.flamesofwar.com
13.   BF are trying to be cautious with the new rules. In summary it seems there are still discussions and heated agreements over aspects of the rules in the playtest group. Peter was careful to point out that this game is precious to BF and they are not treating the new version and the potential fallout lightly. They are calling for reasoned feedback as his team are working very hard on the release and contents. I am personally pleased to hear this. Like many, I have invested lots of money and time in this game and want to hear that it is being cared for and hopefully will be just as good or better in version 4.
14.   The distribution timing and exact method is still being nutted out by Battlefront. However it seems likely that the new V4 and MW releases will be timed together.
15.   One of the most interesting points of the conversation was around why. Peter said that BF need to change, FOW is slowly reducing in popularity. A 300 page rule book is a barrier to entry and that modern games sellers need to change to be more acceptable in the modern, internet-based marked. This will attract new players and keep the game viable.
I can see this everywhere. I personally think this is the right thing for BF to do. Lead the market with innovation. The alternative is a slow and painful decline.
16.   There will be new plastics for MW. YES!!!
17.   We should look out for a new Aussie TY list. YES again!!
18.   Peter personally committed to return to answer questions at a later date. He asked for feedback via WWPD. There is a thread on the excellent WWPD forum at http://forum.wwpd.net/viewtopic.php?f=3&t=20227


We that’s it. In summary I am excited not only about the product but with the care and attention that V4 is being shown. I look forward to the release.

I hope you enjoyed my summary and commentary. Please feel free to leave comments.

Painting Tips 1

I consider myself an average painter. I believe the techniques I use are pretty basic. I find I improve with practice and with tips I pick up from other painters. Most of what I have gleaned has been during my FOW painting time and therefore may be biased to 15mm and WW2

I have found most articles on the internet are designed for great painters and are often high level techniques.

So I thought I would share some of the things that have helped me along the way. I don't claim any of this as mine and therefore would like to put it here for others to use.

Please let me know if you find this useful and I will try to put up more. I will start with what I consider the basics. Again I am no expert, this is what has worked for me

1. Find a pleasant well lit environment. This will be different for everyone. The important thing is that you are comfortable, have your brushes and figures nearby and you can see them well. The best light to paint with is indirect sunlight, otherwise day light globes on both sides of you to eliminate shadow.  You cannot paint what you cannot see.

2. Use the best tools you can afford. This will depend on budget. Windsor and Newton series seven are said to be the best brushes money can buy. I would like to pick some up soon. However I have used hobby and artist brushes to now. I buy sable brushes and the best quality possible. The better they are, given you use the correctly, the longer they will last.

3. Keep your brushes in good condition. For me, this means only dipping the tip in paint so the end of the brushes are wet. If you dip the brush in to the feroul, you will not be able to clean them out fully and this will lead to the brush no longer being able to form a point. The point is critical to painting. Always store them with the plastic protector on the end.

4. Wash hour brushes regularly. This is not only good for the brush. It is good for the painting. Gluggy paint in your brush doesn't flow and means you won't be able to paint as smoothly. Likewise, the longer paint is on the brush, the more time in has to dry and prevent the brush from forming a point.

5. Always undercoat your figures. This can be done by brush, spray can or airbrush. What is important is that there is an undercoat. It will sink into the figure slightly but it will prevent the paint chipping later as it creates something for successive layers to stick to. People use white, black, grey and other things. There are arguments for each of these but for now, just undercoat.

6. Clean your figures. This doesn't mean wash them in detergent. Although some do recommend this. Rather strape and file off mould lines, flash and extra moulding material. Nothing looks worse than a mould line down a figures face or helmet. Take your time, you will still miss some but the more you get the better the figure will look. A file is best for flat or consistent shapes like helmets. A blade is best for flash in hard to reach places. You want to also remember to get the underside if the figure base flat so it can be glued onto the base.

7. Use and old brush for metallic. The metallic pigments in paint is a killer to brushes. Reserve a brush for metallics and never use your best brush.

8. Ask for help. If you see something at a tournament or club meet you like, ask how it was done. Most people love to be asked and will happily share.

9. Always varnish figures when you are finished. It will help protect them from damage when playing and handling.

10. Work out a batch size that suits you. Some people like to paint one base at a time and enjoy the quick achievement. Others want to paint the whole army as one batch and enjoy doing 300 boots in a session. Painting shouldn't be a chore. Work out what you like to do and go with that. Any painting is better than no painting,


Monday, 17 October 2016

Review: Rough Stone Walls

Terrain Approach:
I have been gaming for nearly 30 years. For most of that time, I have used felt and whatever cheap and portable materials I could find. The high (low) point was making trees from plastic Christmas trees. With unfinished bases, these looked particularly sad.

Gladly since moving into Flames of War, the days of felt and butchered Christmas trees are in the past. In the last 5 years, I have picked up a stack of Battlefield in a box (BIAB) - Battlefronts pre-painted terrain line. I have also purchased some other pre-painted terrain, mainly hills.

Whilst most pre-painted terrain looks good, it can look the same as everyone else who has the same pre-painted terrain.

So, I am starting to work on some terrain that is my own. Whether I buy something and paint it, assemble it or make it from scratch, I will hopefully have a table that looks different to other peoples tables. I will continue to buy excellent terrain like BIAB but will supplement it with pieces that I can add my signature, however poorly to.

Review:
Here is my first review then of terrain that is not sold table ready. I picked these stone walls up at a convention (Likely Cancon or MOAB) a few years back. Edit, these are from battlefield accessories. Their website is Here. I don't think these are sold locally in Australia anymore. Thanks to custard for sharing the supplier.

Original Packaging.
                                                                                               
The pack contains 8 hard resin wall sections. Each section is about 10cm long (4 inches) and are moulded with a base. One of the walls has a gate cast into the section. The other 7 are identical and are just basic rock walls.

Pack Contents

Whilst the stones look good, there are quite a few air bubbles in the surface. Otherwise, they are excellent. For $11 a pack, these are good value.

The set provides enough wall to create a small field, cemetery or to wall a building and yard.

Painting:
Whilst I want these to look good and be different, these are terrain pieces and not figures. I have therefore kept it fairly simple.

I sprayed these with a coat of Army Painter Grey.

Base Coated Grey
I then highlighted these with Vallejo Sky gray with a drop of German grey mixed in.


With Highlight
Next up the base and the gate. I hit these areas with some Jo Sonja Burnt Umber. I then highlighted the gate with flat earth.

Base and Gate Painted.

Close up of gate detail.

Modeled in front of building.
The full set painted.
Please look out for more of my terrain reviews as I add more pieces to the collection. I hope you enjoyed this post.


Sunday, 16 October 2016

Tournament Coverage: Waffenbruder 2016 - Day 2

For day one coverage, please click here

Thanks to the Hasty Attack corespondent, here are some pics of day 2.

I understand David and Conrad won. Well done to them.

Deployment
Street Barricades
Defense set
Tankovy and the railway to no where
Tankovy on the attack